
If you want your RV’s water heater to work efficiently and last longer, knowing how to flush it properly is a must. Over time, sediment and mineral buildup can clog your water heater, leading to poor performance or even damage.
But don’t worry—you can handle this simple maintenance task yourself. In this guide, you’ll learn step-by-step how to flush your RV water heater safely and effectively. By following these easy instructions, you’ll enjoy hot water whenever you need it and avoid costly repairs down the road.
Ready to get started? Let’s dive in!

Credit: www.youtube.com
Prepare For Flushing
Preparing your RV water heater for flushing is an important step to keep it working well. Proper preparation helps avoid damage and ensures a smooth cleaning process. Follow these steps carefully before starting the flush.
Turn Off Power Or Gas
First, switch off the power to the water heater. For electric models, turn off the breaker. For gas heaters, close the gas valve. This prevents accidents and protects the unit during flushing.
Shut Off Cold Water Supply
Locate the cold water valve that feeds the water heater. Turn it off to stop water from entering the tank. This allows you to drain the tank completely without new water refilling it.
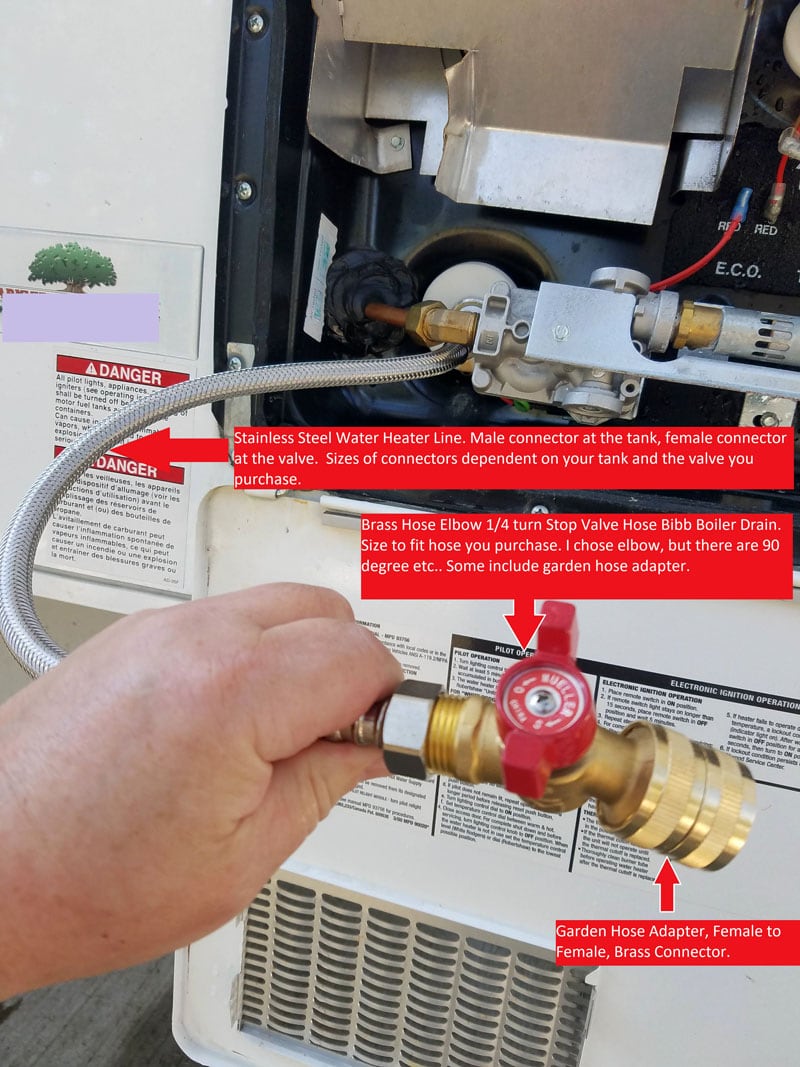
Attach Drain Hose
Connect a drain hose to the water heater’s drain valve. Point the hose to a safe drainage area. This directs water and sediment away from your RV and campsite during flushing.
Credit: thorfamilylaw.com
Drain The Water Heater
Draining the water heater is an essential step in maintaining your RV’s hot water system. It removes built-up sediment and ensures your heater works efficiently. This process also extends the life of the water heater and improves water quality. Follow these simple steps to drain your RV water heater safely and effectively.
Open Hot Water Faucet
Start by turning on a hot water faucet inside your RV. This allows air to enter the system. Air pressure helps the water drain smoothly from the tank. Keep the faucet open throughout the draining process.
Open Drain Valve
Locate the drain valve on your water heater tank. Open it carefully to release the water inside. Use a bucket or hose to catch the draining water. Be cautious as the water may be hot and could cause burns.
Release Sediment Build-up
Allow the water to flow out until it runs clear. Sediment and debris will flush out with the water. If the water does not run clear, gently move the drain valve or tap the tank. This helps break up stubborn sediment at the bottom.
Flush The Tank
Flushing the tank of your RV water heater is an important step to keep it working well. Sediment and minerals can build up inside the tank over time. This buildup lowers the heater’s efficiency and can cause damage. Flushing the tank removes these deposits and helps the heater last longer.
Start the process by draining the tank completely. Then, use fresh water to clean out the sediment inside. This simple maintenance task improves water flow and heating performance.
Use Cold Water To Agitate Sediment
After draining the tank, connect a garden hose to the drain valve. Turn on the cold water supply slowly. The cold water will move inside the tank and loosen the sediment. Let the water flow in for a few minutes. This action helps break up deposits stuck at the bottom. Agitating the sediment makes it easier to flush out completely.
Flush Until Water Runs Clear
Keep the water running through the drain valve. Watch the water coming out. At first, it may be dirty and filled with particles. Continue flushing until the water runs clear. Clear water means most sediment has been removed. Turn off the water supply and close the drain valve. Your water heater tank is now clean and ready for use.

Credit: www.sietesetenta.com.ar
Sanitize The Tank
Sanitizing the tank is a key step in maintaining your RV water heater. It helps kill bacteria and remove any lingering odors. Clean water means safer showers and better tasting water. Let’s explore the simple steps to sanitize your tank effectively.
Add Vinegar Or Sanitizing Solution
Start by adding white vinegar or a sanitizing solution to the tank. Vinegar is a natural cleaner that kills germs. Use about a gallon of vinegar or follow the sanitizer instructions. Pour it into the tank through the water inlet or use a winterization kit. This step prepares the tank for deep cleaning.
Let Solution Sit
Allow the vinegar or sanitizer to sit inside the tank for a few hours. This pause gives the solution time to kill bacteria and break down deposits. Avoid using the water heater during this time. Letting it sit ensures a thorough clean and better water quality.
Flush Out Sanitizer
After the waiting period, flush the tank to remove the sanitizer and loosened debris. Open the drain valve and let water flow out. Keep flushing until the water runs clear and free of vinegar smell. This final rinse clears out contaminants and leaves your tank fresh.
Refill And Restart
After draining and flushing your RV water heater, the next step is to refill and restart it. This process ensures your tank fills safely without leaks or damage. Follow these steps carefully to restore your hot water supply and keep your system running smoothly.
Close Drain Valve
Begin by closing the drain valve tightly. This stops water from leaking out as you refill the tank. Make sure the valve is completely shut to prevent any water loss or air entering the system.
Turn On Cold Water
Next, open the cold water supply to the heater. Allow water to fill the tank slowly. Listen for water running inside and watch for any leaks around the drain valve and connections.
Restore Power Or Gas
Once the tank is full, restore the power or gas supply. For electric heaters, switch the breaker back on. For gas heaters, turn on the gas and relight the pilot if needed. This starts the heating process again.
Maintain For Peak Performance
Maintaining your RV water heater ensures it runs efficiently and lasts longer. Regular care prevents damage and keeps hot water ready when needed. Simple maintenance tasks can avoid costly repairs and improve your RV experience.
Regular Flushing Schedule
Flush the water heater at least once every six months. Sediment builds up inside the tank over time. Flushing removes this buildup and keeps the heater working well. Stick to this schedule even if you do not use the RV often.
Check For Leaks And Corrosion
Inspect the water heater for leaks regularly. Look for any signs of rust or corrosion on the tank and connections. Catching leaks early prevents bigger problems. Fix or replace damaged parts immediately to avoid water damage.
Replace Anode Rod If Needed
The anode rod protects your tank from corrosion. Check it during each flush. If it is worn or coated in rust, replace it. A healthy anode rod extends your water heater’s life and keeps it safe from rust damage.
Troubleshoot Common Issues
Troubleshooting common issues during the RV water heater flush can save time and effort. Some problems happen often and are easy to fix. Knowing what to check helps keep your water heater working well. Here are solutions for common problems you might face.
Stubborn Drain Valve
Sometimes the drain valve gets stuck or hard to open. Use a wrench gently to turn it without forcing. Apply a little lubricant around the valve to loosen it. Avoid using too much force to prevent breaking the valve. If it still won’t open, try tapping it lightly with a rubber mallet. This can help free any rust or debris blocking it.
Sediment Still Present
After flushing, sediment might remain inside the tank. Repeat the flushing process with more water to push out extra debris. Use a flexible hose to reach inside and stir the sediment. Add a small amount of vinegar to help dissolve mineral buildup. Let the vinegar sit for an hour before flushing again. This method clears most stubborn sediment.
Unusual Noises Or Smells
Noises like popping or banging often mean trapped sediment inside the heater. Flushing removes these deposits and stops the sounds. Strange smells can come from bacteria in the tank. Sanitizing the water heater with a bleach solution kills bacteria. Run hot water through all faucets after flushing to clear the system. This keeps your water fresh and safe.
When To Seek Professional Help
Knowing when to call a professional for your RV water heater saves time and prevents damage. Some problems need expert tools and experience. Ignoring signs of trouble can lead to costly repairs or unsafe conditions. Watch for these situations that require expert help.
Unusual Noises Or Leaks
Loud banging, popping, or hissing sounds are warning signs. Water leaks around the heater also signal a problem. These issues can indicate sediment buildup or damaged parts. A technician can diagnose and fix these safely.
Failure To Heat Water Properly
Water that stays cold or takes too long to heat shows a problem. This might result from a faulty thermostat or heating element. Professionals have the right tools to test and replace these parts.
Difficulty Draining Or Flushing
If water drains very slowly or not at all, sediment may block the tank. Forcing the flush can cause damage. Experts use specialized equipment to clear blockages without harming the system.
Electrical Or Gas Issues
Problems with the electrical connections or gas supply can be dangerous. Smelling gas or seeing sparks calls for immediate professional service. Do not attempt repairs yourself in these cases.
Regular Maintenance Checks
Scheduling periodic inspections with a pro ensures your water heater stays in good shape. They catch small problems before they grow. This helps avoid unexpected breakdowns on the road.
Frequently Asked Questions
How Do I Flush My Rv Hot Water Heater?
Turn off power or gas to the heater. Close cold water inlet. Attach hose to drain valve and drain tank. Open hot water faucet to vent air. Flush tank by briefly opening and closing valves until water runs clear. Refill and restore power or gas.
What Is The Process For Flushing An Rv Water Tank?
Turn off power and cold water supply. Attach a hose to the drain valve. Open hot faucet, drain tank fully. Flush with cold water until clear. Close drain, refill tank, and restore power.
Can I Flush My Hot Water Heater Myself?
Yes, you can flush your hot water heater yourself. Turn off power, shut cold water, connect hose, open drain, flush sediment, then refill.
How Much Vinegar To Clean A Rv Hot Water Heater?
Use about 4 gallons (16 liters) of white vinegar to clean an RV hot water heater effectively.
Conclusion
Flushing your RV water heater keeps it working well and extends its life. Regular cleaning removes sediment that can block pipes and reduce heat. Use simple tools and follow steps carefully for best results. Take time to flush it at least once a year or more.
Clean water means better tasting water and safer showers. Keep your RV comfortable and ready for every trip. Maintenance like this saves money and avoids big repairs later. Stay on top of your water heater care to enjoy smooth RV adventures.
