Thinking about powering your RV with solar energy but worried about drilling holes in your roof? You’re not alone.
Drilling can cause leaks, damage, and reduce your RV’s value. Luckily, there are smart ways to mount solar panels without putting a single hole in your roof. Imagine harnessing the sun’s power while keeping your RV’s roof intact and worry-free.
You’ll discover simple, effective methods to install solar panels safely and securely—no drilling required. Ready to protect your RV and enjoy clean energy on the road? Keep reading to find out how you can do it yourself with confidence.
You May Like
- [Wide Application]: Daily Output 800wh/day under 4 hours full sunshine…
- [Excellent Performance]: ECO-WORTHY solar panels use high-performance…
- [Durable]: Corrosion-resistant aluminum alloy frame, so that the panel can…
- [Complete and Easy]: The back of the pre-drilled and plug-and-play cables…

- 【N-Type 16BB High-Efficiency Solar Cells】The Callsun 200 watt solar…
- 【Boost Your Power with Bifacial Technology】Callsun 400W bifacial solar…
- 【TwinCell Anti-Shade Technology】The Callsun 200W solar panel uses an…
- 【Perfect Fit for Class B Vans & Easy Installation】Measuring 51.3 x 30.3…

- 【High Conversion Rate】This 20W solar panel with monocrystalline A+…
- 【Built to Last】 Low-iron tempered glass surface and corrosion-resistant…
- 【Smart Charge Controller】The charging efficiency of this upgraded 8A…
- 【Easy to Install & Angle Adjustable】- Equipped with a 360 degree angle…
- [Wide Application] 800Wh daily output depends on the 4 hours sunlight…
- [Excellent Performance] 22% High solar cell efficiency; Corrosion-resistant…
- [Multiple Protection] The Renogy Adventurer-Li 30A PWM charge controller is…
- [Easy Installation] Pre-drilled holes and Plug&Play cables on the back…

- 【High-Efficiency MPPT Controller】This advanced MPPT charge controller…
- 【Various of Application】 SOLPERK Solar Panel Kit own monocrystalline A+…
- 【Easy to install】Pre-drilled holes on the back and plug and play cable,…
- 【Parcel Content】 Solar Panel kit includes 1PC 100W monocrystalline…

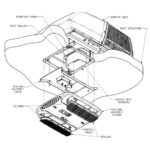
Credit: www.rvwithtito.com
Reasons To Avoid Drilling
Choosing to mount solar panels on an RV roof without drilling offers several important benefits. Avoiding holes protects the roof’s structure and preserves its condition over time. It also keeps the installation process simple and faster. These reasons make non-drilling methods popular among RV owners.
Preventing Roof Damage
Drilling holes can cause leaks and water damage inside the RV. Water can seep into the roof layers, leading to mold and rot. Even small holes weaken the roof’s waterproof barrier. Using non-drilling mounts keeps the roof intact and safe from harm.
Maintaining Roof Warranty
Many RV roof warranties become void if holes are drilled. Manufacturers require the roof to stay sealed and undamaged. Avoiding drilling helps keep the warranty valid. This protection saves money by preventing costly repairs not covered by warranty.
Simplifying Installation
Mounting solar panels without drilling saves time and effort. There is no need for special tools or complicated sealing. Methods like adhesive tapes or clamps make installation easier. This allows RV owners to install solar panels themselves quickly and safely.
Adhesive Mounting Methods
Mounting solar panels on an RV roof without drilling protects the roof’s integrity. Adhesive mounting methods offer a reliable way to attach panels securely. These methods avoid holes and leaks while providing strong, weather-resistant bonds. The right adhesive technique depends on your RV roof type and panel size.
Using Heavy-duty Tape
Heavy-duty tape, like VHB (Very High Bond) tape, sticks solar panels firmly to the roof. This tape handles vibrations and weather changes well. It creates a waterproof seal that prevents leaks. The tape works best on clean, smooth surfaces. For extra hold, seal edges with a waterproof sealant. This method is quick and leaves no damage.
Spray Polyurethane Foam (spf)
Spray polyurethane foam bonds mounts directly to the roof. It expands to fill gaps and creates a strong grip. SPF works well on uneven or complex roof shapes. The foam also adds insulation, reducing heat build-up. It dries fast and resists weathering. Proper surface cleaning is key for the foam to stick well.
Solar Stack Mount System
The Solar Stack system uses adhesive pads combined with lightweight frames. These pads stick to the roof without drilling holes. The frame holds panels securely and allows airflow underneath. This reduces heat and boosts panel performance. The system suits flat or slightly curved RV roofs. It offers a neat, low-profile installation.
Clamp-based Mounting Options
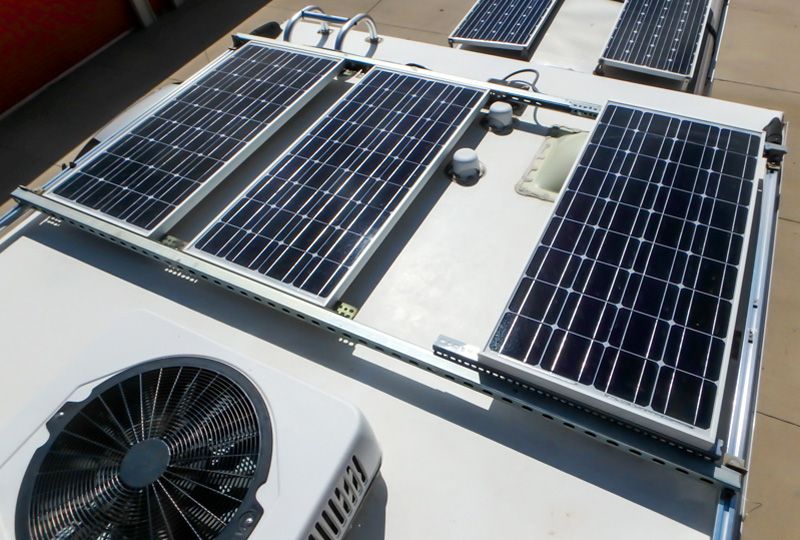
Clamp-based mounting options provide a smart way to install solar panels on an RV roof without drilling holes. These mounts secure panels firmly using clamps that grip the roof structure. They protect the roof’s integrity and prevent leaks. Clamp mounts work well on certain roof types, especially metal roofs with standing seams. They offer a clean, damage-free installation that suits many RV owners.
Seam Clamps For Metal Roofs
Seam clamps attach directly to the vertical seams of metal roofs. These seams run along the length of the roof panels. The clamps grip the seams tightly, holding solar panel rails without drilling. This method keeps the roof waterproof and intact. Installing seam clamps is quick and does not require special tools. They allow easy removal or repositioning of panels if needed. This option is ideal for RVs with standing seam metal roofs.
Rail Systems With Minimal Penetrations
Rail systems use clamps to secure rails that hold solar panels. The clamps connect to the roof’s edges or seams with very few or no holes. These rails create a stable base for mounting panels. The system spreads the panel weight evenly, reducing roof stress. Some rail mounts use adhesive pads to stick to the roof, minimizing penetrations. This approach combines strong support with roof protection. It suits RV owners who want a secure, low-impact solar setup.
Flexible Solar Panels
Flexible solar panels offer a lightweight and low-profile option for RV owners. Their bendable design fits curved and uneven roofs easily. These panels reduce wind resistance and the risk of damage during travel. Installing them without drilling helps maintain the roof’s integrity. Two common methods for attaching flexible solar panels without holes are direct adhesion and using Velcro or tape.
Direct Adhesion Techniques
Direct adhesion involves sticking the solar panels straight onto the roof surface. Special adhesives and strong double-sided tapes work well for this. Clean the roof thoroughly before applying the adhesive to ensure a secure bond. This method keeps the panels flat and flush with the roof.
Adhesives designed for outdoor use resist weather and temperature changes. This ensures panels stay attached even in harsh conditions. Direct adhesion also eliminates gaps where water might enter. It is a simple, neat, and effective way to mount flexible solar panels without drilling.
Velcro And Tape Attachments
Velcro strips and heavy-duty tapes provide a removable mounting option. Attach one side of the Velcro or tape to the panel and the other to the roof. This setup allows easy removal for maintenance or repositioning. It works best on smooth, clean roof surfaces.
High-quality outdoor Velcro or tape withstands wind, rain, and sun exposure. Applying sealant over the tape edges helps prevent water infiltration. This method offers flexibility and avoids any permanent marks or holes on the roof.
Ballasted Systems
Ballasted systems offer a smart way to mount solar panels on an RV roof without drilling holes. These systems rely on weights to keep solar panels secure. They protect the roof from damage and maintain its waterproof seal. Ballasted mounting is a popular choice for RV owners who want to avoid roof penetration. It is especially useful for flat or low-slope roofs where other mounting methods may be tricky.
Using Weights For Stability
Ballasted systems use heavy objects such as concrete blocks or metal weights. These weights hold down the solar panel racks firmly. The weight prevents the panels from moving or lifting in strong winds. This method eliminates the need for screws or bolts to attach the panels to the roof. It keeps the roof surface intact and avoids leaks. Weights can be adjusted to balance the system for better stability.
Suitability For Flat Roofs
Flat RV roofs are ideal for ballasted solar panel systems. The even surface allows weights to sit securely without sliding. Ballasted mounts reduce the risk of roof damage common with drilled installations. This method also works well on rubber or TPO roofs, which are sensitive to penetrations. Ballasted systems are easy to remove or reposition, making them flexible for RV travel. They provide a safe, non-invasive solution for solar panel installation on flat RV roofs.
Preparing The Roof Surface
Preparing the roof surface is a crucial step for mounting solar panels on an RV roof without drilling. A clean and compatible surface ensures strong adhesion and long-lasting performance. Taking time to prepare the roof prevents damage and improves panel stability.
Cleaning And Drying
Start by removing dirt, dust, and debris from the roof surface. Use a soft brush or cloth to avoid scratches. Washing the roof with mild soap and water helps remove grease or oils. Rinse thoroughly and let the roof dry completely before proceeding. A dry surface ensures better adhesion for mounting materials.
Compatibility Checks
Check the roof material type before choosing mounting options. Different surfaces require specific adhesives or tapes. Ensure the mounting method suits your RV roof, whether it is fiberglass, rubber, or metal. Test a small area with the adhesive to see if it sticks well. Confirming compatibility avoids peeling and water leaks later.
Wind And Weather Considerations
Mounting solar panels on an RV roof without drilling requires careful attention to wind and weather. Panels face strong winds and rain while you travel. Proper installation protects both your RV and the solar system. Understanding wind resistance and waterproofing is key. This helps keep panels secure and prevents roof damage.
Ensuring Wind Resistance
Solar panels must stay fixed during high winds. Use strong mounting brackets designed for no-drill setups. Heavy-duty adhesive tapes and clamps work well. Place panels in low-wind areas of the roof if possible. Check the system regularly for loose parts. Secure cables to avoid wind damage. Proper wind resistance extends panel life and safety.
Waterproofing And Sealants
Water can damage your RV roof and solar panels. Seal all edges and joints with high-quality waterproof sealants. Use weatherproof tapes like Eternabond for extra protection. Apply sealants after mounting, covering all exposed areas. Inspect sealants regularly and reapply if needed. Good waterproofing stops leaks and keeps your roof intact.
Credit: www.xmwintop.com
Tools And Materials Needed
Mounting solar panels on an RV roof without drilling requires specific tools and materials. These ensure a secure hold while protecting your roof from damage. Choosing the right supplies makes the installation easier and safer.
Planning ahead helps avoid mistakes. Gather all necessary items before starting your project.
Recommended Adhesives And Tapes
Strong adhesives are key to a lasting mount. Look for weather-resistant, UV-stable options. Polyurethane adhesives offer excellent bonding with RV roof materials.
VHB (Very High Bond) tapes are popular for their strong grip. They create a watertight seal and reduce wind lift risks. Use heavy-duty sealing tapes like Eternabond over VHB for extra protection.
Mounting Hardware Essentials
Non-penetrating mounting brackets and clamps work best. These attach firmly without piercing the roof surface. Rubber pads help protect the roof and improve grip.
Use stainless steel screws and bolts for durability in harsh weather. Cable ties and Velcro strips assist in securing cables and panels neatly. A caulking gun with sealant prevents water leaks around hardware.
Step-by-step Installation Guide
Installing solar panels on your RV roof without drilling protects your roof from leaks. This guide breaks down the process into clear, easy steps. Follow these instructions to mount panels safely and securely without making holes.
Measuring And Planning Panel Layout
Start by cleaning the RV roof surface thoroughly. Use a tape measure to check the available roof space. Mark the exact positions where you want each solar panel. Ensure panels do not block vents or antennas. Leave room for wiring and airflow under the panels. Planning the layout helps avoid mistakes during installation.
Applying Adhesives Or Clamps
Choose a strong adhesive made for outdoor use, such as industrial-strength foam tape or specialized solar panel glue. Apply the adhesive evenly on the panel’s mounting points. Press the panel firmly onto the roof surface. For metal roofs, use seam clamps that attach to roof seams without drilling. Check that adhesives or clamps hold the panel tightly and evenly.
Securing Panels Safely
Double-check that panels are stable and aligned correctly. Use additional clamps or brackets if needed for extra security. Seal edges around the panel with waterproof sealant to prevent water damage. Run all wiring carefully along the roof, securing cables with clips or ties. Test the panel’s stability by gently pressing on it. Proper securing prevents wind damage during travel.
Maintenance And Inspection Tips
Maintaining and inspecting solar panels mounted on an RV roof without drilling is vital. Proper care ensures long-lasting performance and prevents damage to your RV roof. Regular checks keep the adhesive strong and the panels clean. This section guides you through simple maintenance and inspection tasks.
Checking Adhesive Integrity
Inspect the adhesive regularly to confirm it holds firmly. Look for peeling edges or loose spots around the panels. Press gently on the panels to test adhesion strength. Replace or reapply adhesive if you notice any weakness. Strong adhesive keeps panels secure during travel and weather changes.
Cleaning Panels And Roof Surface
Clean the solar panels to remove dust, dirt, and bird droppings. Use a soft cloth or sponge with mild soap and water. Avoid harsh chemicals that can damage the panel surface. Clean the roof area around the panels to prevent debris buildup. Clean panels absorb more sunlight and work better.

Credit: www.youtube.com
Frequently Asked Questions
How To Attach Solar Panels To Roof Without Drilling?
Attach solar panels without drilling by using adhesive mounts, heavy-duty tape, or seam clamps for metal roofs. Clean the roof thoroughly first. Use weighted ballasted racks on flat roofs to secure panels safely and protect the roof. Flexible panels can stick with VHB tape or Velcro for temporary setups.
What Is The 33% Rule In Solar Panels?
The 33% rule in solar panels means the array should not exceed 33% of your roof’s total area. This ensures proper airflow, prevents overheating, and maintains structural integrity. Following this rule optimizes efficiency and extends the solar panel lifespan.
What Is The Best Adhesive For Solar Panels On A Motorhome?
The best adhesive for motorhome solar panels is high-strength, weather-resistant polyurethane or butyl tape. Clean the roof surface first. Use products like Eternabond or VHB tape for secure, durable bonding without drilling. Ensure compatibility with your roof material and rated wind resistance for safety.
What Is The 20% Rule For Solar Panels?
The 20% rule for solar panels limits shading or obstruction to 20% of the panel surface. This ensures optimal energy production and efficiency.
Conclusion
Mounting solar panels on your RV roof without drilling saves time and prevents leaks. Using adhesive tapes, clamps, or weighted systems keeps your roof intact. Clean the roof well before installation for strong adhesion. Choose the right method based on your roof type and travel needs.
This approach offers a safe, reliable way to enjoy solar power on the road.