Skip to content
If you want your RV water heater to work efficiently and last longer, knowing how to drain it properly is a must. Over time, sediment and minerals build up inside the tank, which can cause your heater to perform poorly or even break down.
Draining your RV water heater is a simple step that can save you money and prevent frustrating cold showers on the road. In this guide, you’ll learn exactly how to drain your RV water heater safely and easily, with tips to clean it out and keep it running like new.
Stick with me, and you’ll have the confidence to maintain your water heater yourself—no costly repairs needed!
Shut Down Power And Water
Before draining your RV water heater, shutting down power and water is essential. This step prevents accidents and protects your heater’s components. Turning off the power stops the heating element from running dry. It also avoids damage from sudden temperature changes.
Stopping the water supply avoids unwanted leaks or spills. It ensures the water heater can drain completely and safely. Follow these steps carefully to prepare your system for draining.
Turn Off Electrical Power
Locate your RV’s circuit breaker panel. Find the breaker for the water heater and switch it off. This stops electricity from reaching the heating element. If your water heater uses a gas pilot, turn off the gas supply too. Confirm all power sources are disconnected before proceeding.
Shut Off Water Supply
Find the main water valve that feeds your RV’s water heater. Close this valve to stop water flow into the tank. If connected to city water, disconnect the hose. This prevents water from refilling the heater while you drain it. Double-check that no water is entering the system.
Release Pressure Safely
Open a hot water faucet inside the RV. This releases pressure inside the water heater tank. Next, open the pressure-temperature relief valve on the heater. This valve prevents pressure buildup during draining. Let air enter the tank through the open valve for smooth drainage.
Drain The Water Heater
Draining the water heater in your RV is an important step to maintain its efficiency. It helps remove sediment build-up that can reduce heating performance and damage the tank. Regular draining also prevents corrosion and extends the life of your water heater.
Before draining, ensure the water heater is turned off and cooled down. This avoids burns and other safety risks. Draining the tank involves opening key valves and removing plugs to let water flow out completely.
Open Pressure-temperature Relief Valve
Locate the pressure-temperature (T&P) relief valve on the water heater. It usually sits near the top or side of the tank. Open this valve to release pressure and allow air to enter the tank.
Opening the T&P valve prevents vacuum formation. This helps the water drain smoothly and quickly from the tank. Use caution, as hot water may spray out if the heater was recently used.
Remove Drain Plug Or Anode Rod
Find the drain plug or anode rod at the bottom of the water heater. Use a wrench to carefully unscrew it. Water will start to flow out once the plug is removed.
Removing the anode rod can also help flush out sediment. Let the water drain fully into a bucket or drain hose. After draining, replace the plug or rod securely to avoid leaks.
Flush Out Sediment
Flushing out sediment from your RV water heater keeps it working well. Sediment builds up inside the tank over time. This buildup reduces heating efficiency and may cause damage. Removing sediment regularly extends the life of the water heater. Follow these steps to flush out sediment safely and thoroughly.
Attach Flush Wand Or Hose
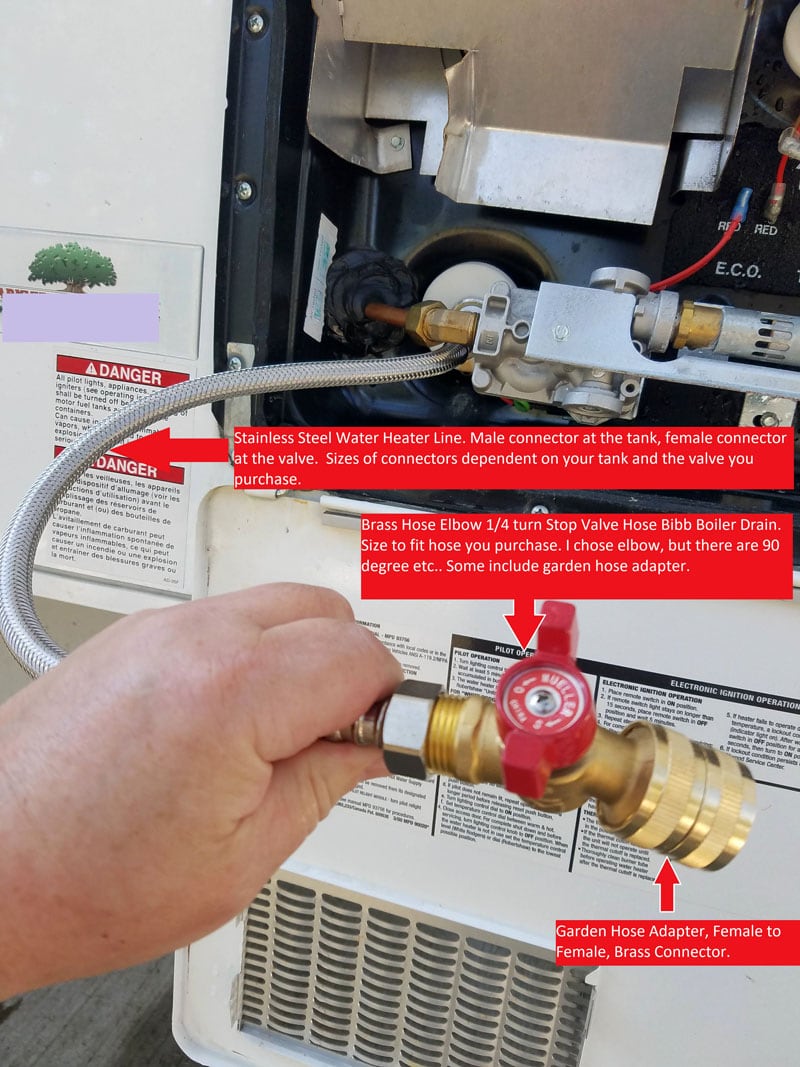
Start by connecting a flush wand or garden hose to the water heater’s drain valve. The wand helps reach inside the tank to loosen dirt. If using a hose, attach it tightly to avoid leaks. Make sure the other end leads to a safe drainage spot. This setup will let you spray water inside the tank easily.
Spray Water To Dislodge Buildup
Turn on the water supply to the flush wand or hose. Spray water inside the tank to break up sediment. Move the wand around to reach all areas inside. The water pressure pushes dirt and sediment loose. You may see cloudy water draining out. This step clears most of the buildup inside the tank.
Repeat Until Water Runs Clear
Keep flushing with water until the draining water is clear. Clear water means most sediment has been removed. Check by looking at the water color as it flows out. If still cloudy, continue spraying and draining. Repeat these steps to ensure a clean tank. A sediment-free tank heats water better and lasts longer.
Credit: thorfamilylaw.com
Deep Clean With Vinegar
Performing a deep clean with vinegar helps remove mineral buildup inside your RV water heater. Vinegar is a natural, mild acid that breaks down scale and sediment. This process improves water heater efficiency and extends its life.
Regular deep cleaning prevents clogs and maintains good water flow. It also reduces odors caused by bacteria growing in the tank. Using vinegar is safe and eco-friendly compared to harsh chemicals.
Fill Tank With Vinegar Mixture
Start by mixing white vinegar with water in a 1:1 ratio. Pour the mixture into the RV water heater tank. Fill the tank completely to cover all internal surfaces.
Make sure the tank is empty before adding the vinegar solution. This allows the vinegar to reach all parts of the tank for thorough cleaning.
Heat To Dissolve Scale
Turn on the water heater and let it heat the vinegar mixture. Warm vinegar dissolves mineral deposits faster. Heat the tank for about 1 hour, but do not boil the solution.
Keep the water heater powered on during this time. Heating activates the vinegar’s cleaning effect on scale and sediment.
Drain And Rinse Thoroughly
After heating, turn off the water heater and drain the vinegar mixture completely. Open all faucets to let the vinegar flow out.
Refill the tank with fresh water and drain it again. Repeat rinsing until no vinegar smell remains. This ensures all residues wash away.
Reassemble And Seal
After draining the RV water heater, reassembling and sealing the unit is crucial. This step prevents leaks and ensures the heater works properly. Proper reassembly saves time and protects your RV’s water system. Follow each action carefully for a tight, secure seal.
Reinstall Drain Plug Or Anode Rod
Start by placing the drain plug or anode rod back into its original spot. The drain plug stops water from leaking out. The anode rod helps prevent tank corrosion. Tighten the plug or rod by hand first, then use a wrench for a snug fit. Avoid overtightening, which can damage the threads. Check that the part sits flush against the tank surface.
Apply Teflon Tape For Seal
Before reinstalling, wrap Teflon tape around the drain plug or anode rod threads. This tape acts as a sealant to stop leaks. Wrap the tape clockwise so it tightens with the threads. Two to three layers of tape usually work well. Smooth the tape down to remove any air bubbles or wrinkles. This simple step improves the water heater’s seal and prevents drips.
Final Faucet Check
After draining and flushing your RV water heater, a final faucet check ensures everything works properly. This step confirms that no residue remains and your water lines are clear. It also helps you catch any issues before you hit the road again.
Run Hot And Cold Water
Turn on both hot and cold water faucets inside your RV. Let the water run for several minutes. This action clears out any leftover sediment or vinegar from the flushing process. Watch for smooth water flow without sputtering or strange noises.
Ensure No Vinegar Smell
Check the water coming from the faucets for any vinegar odor. Vinegar is often used to clean the tank and remove buildup. If you smell vinegar, keep running the water until the scent disappears. This step prevents unpleasant tastes during your next use.
Reinstall Faucet Aerators
Remove the faucet aerators before flushing to avoid clogging. Now, screw them back on tightly. Clean aerators help maintain good water pressure and filter debris. Make sure each aerator fits securely to avoid leaks.
Tools And Safety Tips
Draining an RV water heater requires the right tools and safety measures. Proper tools make the job easier and protect your equipment. Safety tips keep you safe while working with hot water and electrical parts. Understanding these basics helps prevent damage and injury.
Flush Wand Benefits
A flush wand helps clean the inside of the water heater tank. It sprays water at high pressure to remove sediment and buildup. This tool reaches spots a normal hose cannot. Using a flush wand keeps your tank clean and extends its life. It saves time and improves water heater efficiency.
Anode Rod Inspection And Replacement
The anode rod protects the tank from rust and corrosion. Check it during draining to see if it is worn out. A damaged rod must be replaced to avoid tank damage. Inspect the rod every year or two for best results. Replacement rods are inexpensive and easy to install.
Safety Precautions
Turn off power to the water heater before draining. This stops electric shocks or gas leaks. Let the water cool down to avoid burns. Wear gloves and eye protection during the process. Open pressure valves slowly to release built-up pressure safely. Follow these steps to keep yourself and your RV safe.

Credit: www.esseg.eu

Credit: www.youtube.com
Frequently Asked Questions
How Do I Flush My Rv Hot Water Heater?
Turn off power and water supply. Open T&P valve and drain plug to empty tank. Use a flush wand or hose to spray inside. Flush until water runs clear. For deep cleaning, fill with vinegar-water mix, heat for an hour, drain, then flush with fresh water until odor-free.
How Do I Drain My Rv Water Tank?
Turn off power and water supply. Open the pressure-temperature relief valve and drain plug. Drain all water completely. Flush with fresh water to remove sediment. Close valves securely before restarting the system.
How Long Can Fresh Water Sit In An Rv Tank?
Fresh water can safely sit in an RV tank for up to 5 days. After that, bacteria and algae may grow, affecting water quality. Regular cleaning and sanitizing help maintain freshness and prevent contamination. Always drain and refill the tank before long storage periods.
What Happens If You Never Flush Your Water Heater?
Neglecting to flush your water heater causes sediment buildup, reducing efficiency and lifespan. It leads to overheating, corrosion, and potential tank damage. Regular flushing prevents clogs, improves heating performance, and saves energy costs.
Conclusion
Draining your RV water heater keeps it working well and lasting longer. Always turn off power and water before starting. Open the valves carefully to let all water out. Flushing removes sediment that can cause damage over time. Repeat flushing until the water runs clear and free of debris.
Proper maintenance helps avoid costly repairs on the road. Take your time and follow each step for best results. A clean water heater means hot water ready when you need it. Keep your RV comfortable with this simple care routine.