Skip to content
Are your RV running lights not working, leaving you worried about safety and legal issues on the road? You’re not alone, and this problem can be frustrating, especially when your brake lights still function perfectly.
Understanding why your running lights fail while other lights shine bright is key to fixing the issue quickly. You’ll discover the most common causes behind this problem—from burnt-out bulbs and blown fuses to corroded sockets—and easy steps you can take to restore your RV’s lighting.
Keep reading, and you’ll be back on the road with all your lights glowing in no time.
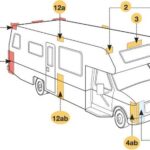
Credit: www.etrailer.com
Common Causes
RV running lights not working can be frustrating and unsafe. Identifying the common causes helps fix the problem quickly. Most issues relate to bulbs, wiring, or fuses. Understanding these common causes saves time and money.
Burnt-out Dual-filament Bulb
Many RV running lights use dual-filament bulbs. One filament works for running lights, the other for brake lights. The brake light filament may still work while the running light filament burns out. Replacing the bulb often solves this issue. Check the bulb carefully for any dark spots or broken filaments.
Bad Ground Or Socket Corrosion
A bad ground connection can stop running lights from working. Corrosion inside the bulb socket also blocks electricity flow. Clean the socket and check the ground wire for tight connections. Fixing these simple issues restores power to the running lights. Use a wire brush or electrical cleaner to remove corrosion.
Blown Fuse
Running lights usually have their own fuse separate from brake lights. A blown fuse cuts power to the running lights but not other lights. Locate the fuse box and inspect the fuse labeled “tail,” “park,” or “parking lamp.” Replace any blown fuses with the correct amperage. This is an easy fix that often solves the problem.
Basic Troubleshooting
Basic troubleshooting helps identify common issues causing RV running lights to fail. Start with simple checks before moving to complex repairs. These steps save time and avoid unnecessary expenses. Focus on bulbs, sockets, and fuses first. They often cause the problem.
Check And Replace Bulbs
Burned-out bulbs are the most common reason running lights stop working. Remove each bulb and inspect it closely. Look for broken filaments or dark spots inside the bulb. Replace any damaged bulbs with the correct type. Test the lights again after replacement to confirm the fix.
Inspect And Clean Sockets
Dirty or corroded sockets can prevent bulbs from receiving power. Check each socket for rust, dirt, or debris. Clean the sockets using a small wire brush or electrical contact cleaner. Make sure sockets are dry before reinserting bulbs. A clean socket improves the electrical connection and light function.
Test And Replace Fuses
Fuses protect the running light circuit from electrical faults. Locate the fuse box in your RV and find the fuse for running lights. Remove the fuse and check if the metal strip inside is broken. Replace any blown fuses with the correct rating. After replacing, test the lights again to see if the problem is fixed.
Wiring And Ground Issues
Wiring and ground problems often cause RV running lights to fail. Faulty wires or weak ground connections stop electricity from flowing properly. These issues can make lights flicker or not turn on at all. Checking wiring and grounds is a key step in fixing running light problems.
Electricity needs a complete path to work well. Loose wires break this path. Bad ground connections stop current from returning to the battery. Both problems lead to running lights not working.
Look For Loose Or Damaged Wires
Start by inspecting all wires linked to the running lights. Look for cuts, cracks, or worn insulation. Damaged wires can short or fail to carry power. Tug gently on wires to find loose connections. Loose wires may not send power to the lights. Replace or repair any damaged or loose wiring you find. Use electrical tape or wire connectors for secure repairs.
Verify Proper Ground Connections
Ground wires connect the lights to the RV’s metal frame. This completes the electrical circuit. Check that ground wires are firmly attached to clean metal surfaces. Remove any rust, paint, or dirt where ground wires connect. A poor ground causes lights to dim or not work. Tighten loose ground screws or bolts. If needed, replace corroded ground wires or connectors to restore a strong ground path.
Connector Problems
Connector problems often cause RV running lights not to work. The connectors link your RV’s wiring to the vehicle’s electrical system. Dirt, corrosion, or a loose fit can stop power flow. This can make the running lights fail even if other lights work fine. Checking and fixing connectors is a simple first step to solve this issue.
Inspect Vehicle-side Connectors
Begin by examining the connectors on your vehicle side. Look for bent or broken pins. Pins should be straight and clean. Check for corrosion or rust on metal parts. Any damage can block electricity. Also, ensure no wires are loose or frayed near the connector.
Clean Connector Terminals
Dirty or corroded terminals often cause poor connections. Use electrical contact cleaner to spray the terminals. Avoid water or harsh chemicals. After spraying, gently scrub with a small brush or cloth. Cleaning removes grime and corrosion. Dry the terminals fully before reconnecting.
Ensure Snug Connector Fit
The connector must fit tightly to work well. Loose connectors cause intermittent power loss. Push the connector firmly until it clicks or locks in place. Wiggle it slightly to check for movement. If it feels loose, try bending pins slightly or replacing the connector. A secure fit ensures steady power to running lights.
Advanced Fixes
Advanced fixes for RV running lights not working involve deeper electrical checks. These require basic tools and some knowledge of your RV’s wiring system. Troubleshooting beyond fuses and bulbs can save time and money.
Start by inspecting components that control the lighting circuit. These parts often cause hidden issues that simple checks miss. Careful testing and observation reveal the root problem.
Check Light Switch Functionality
The light switch controls power flow to running lights. A faulty switch can block current, causing lights to fail. Use a multimeter to test the switch’s continuity. Turn the switch on and off while measuring. No continuity means the switch is defective.
Inspect the switch for physical damage or loose connections. Clean any dirt or corrosion around terminals. Replace the switch if it does not pass the continuity test. This fix often restores running light function instantly.
Test Control Module
Many RVs use a control module to manage exterior lights. This module can fail due to heat, moisture, or electrical surges. Locate the module and check for signs of damage or corrosion.
Use a diagnostic tool or multimeter to test the module’s output signals. Compare readings to the RV manual’s specifications. If outputs are weak or missing, the module likely needs replacement.
Resetting the module by disconnecting power for a few minutes can sometimes clear faults. Persistent problems require a new control module to restore proper light operation.

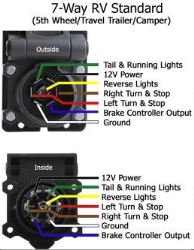
Credit: www.escapeforum.org
Safety Tips
Ensuring your RV running lights work properly is vital for safety on the road. Faulty running lights can cause accidents, especially at night or in bad weather. Follow simple safety tips to keep your lights bright and reliable. These tips help prevent electrical issues and improve your RV’s visibility.
Use Dielectric Grease
Apply dielectric grease to your light sockets and connectors. This grease prevents moisture and dirt from causing corrosion. Corrosion can block electrical signals, making your running lights fail. A small amount of grease can extend the life of your lights. It also makes removing bulbs easier without damage.
Regular Maintenance Checks
Check your running lights often for signs of damage or wear. Test lights before every trip to catch problems early. Look for cracked lenses, loose wires, and burnt-out bulbs. Clean connectors and sockets to ensure good contact. Replace any faulty parts immediately to avoid safety risks on the road.
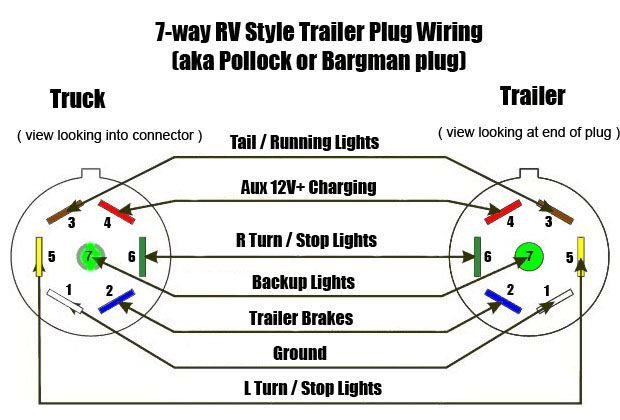
Credit: olivertraveltrailers.com
Frequently Asked Questions
Why Are My Trailer Running Lights Not Working But Everything Else Is?
Check for a burnt-out dual-filament bulb, blown fuse, or corroded socket. Clean connectors and ensure proper grounding.
Why Do My Brake Lights Work But Not My Running Lights?
Your brake lights work but running lights don’t because the running light filament is burnt out, the socket is corroded, or the parking light fuse is blown. Check and replace the dual-filament bulb, clean the socket, and inspect the fuse for parking or tail lights.
Is There A Fuse For Rear Running Lights?
Yes, rear running lights usually have a dedicated fuse in the fuse box. Check the “tail,” “park,” or “parking lamp” fuse. Replace it if blown to restore running light function.
How Do I Know If My Rv Fuse Is Blown?
Check your RV fuse by inspecting it visually for a broken metal strip or discoloration. Use a multimeter to test continuity. If the fuse is blown, replace it with the same type and rating.
Conclusion
Troubleshooting RV running lights is simpler than it seems. Start by checking bulbs, fuses, and wiring connections. Clean any corrosion and ensure proper grounding. Small fixes often solve the problem quickly. Regular maintenance helps avoid future issues on the road.
Stay safe by keeping your running lights working well. Remember, a few minutes of care can prevent big troubles later. Keep your RV lighting bright and reliable for every trip.